Java IO学习-NIO 网络编程
非阻塞 vs 阻塞
阻塞模式
阻塞模式下,相关方法都会导致线程暂停
ServerSocketChannel.accept会在没有连接建立时让线程暂停SocketChannel.read会在没有数据可读时让线程暂停- 阻塞的表现其实就是线程暂停了,暂停期间不会占用 cpu,但线程相当于闲置
单线程下,阻塞方法之间相互影响,几乎不能正常工作,需要多线程支持
但多线程下,有新的问题,体现在以下方面
- 32 位 JVM 一个线程 320k,64 位 JVM 一个线程 1024k,如果连接数过多,必然导致 OOM,并且线程太多,反而会因为频繁上下文切换导致性能降低
- 可以采用线程池技术来减少线程数和线程上下文切换,但治标不治本,如果有很多连接建立,但长时间 inactive,会阻塞线程池中所有线程,因此不适合长连接,只适合短连接
编写服务端代码:
public class NettyServer {
public static void main(String[] args) {
// 创建缓冲区
ByteBuffer buffer = ByteBuffer.allocate(16);
// 获得服务器通道
try(ServerSocketChannel server = ServerSocketChannel.open()) {
// 为服务器通道绑定端口
server.bind(new InetSocketAddress(8080));
// 用户存放连接的集合
ArrayList<SocketChannel> channels = new ArrayList<>();
Scanner scanner = new Scanner(System.in);
// 循环接收连接
while (true) {
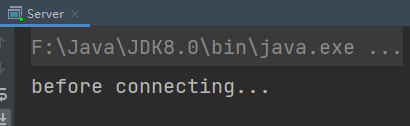
System.out.println("before connecting...");
// 没有连接时,会阻塞线程
SocketChannel socketChannel = server.accept();
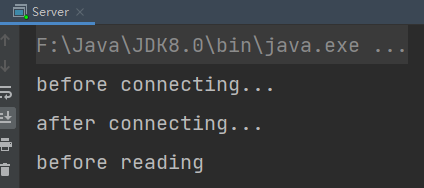
System.out.println("after connecting...");
channels.add(socketChannel);
// 循环遍历集合中的连接
for(SocketChannel channel : channels) {
System.out.println("before reading");
// 处理通道中的数据
// 当通道中没有数据可读时,会阻塞线程
channel.read(buffer);
buffer.flip();
// 这里使用之前的 debug 工具
ByteBufferUtil.debugRead(buffer);
// 发送内容
String next = scanner.next();
ByteBuffer byteBuffer = ByteBuffer.wrap(next.getBytes());
while (byteBuffer.hasRemaining()) {
channel.write(byteBuffer);
}
buffer.clear();
System.out.println("after reading");
}
}
} catch (IOException e) {
e.printStackTrace();
}
}
}
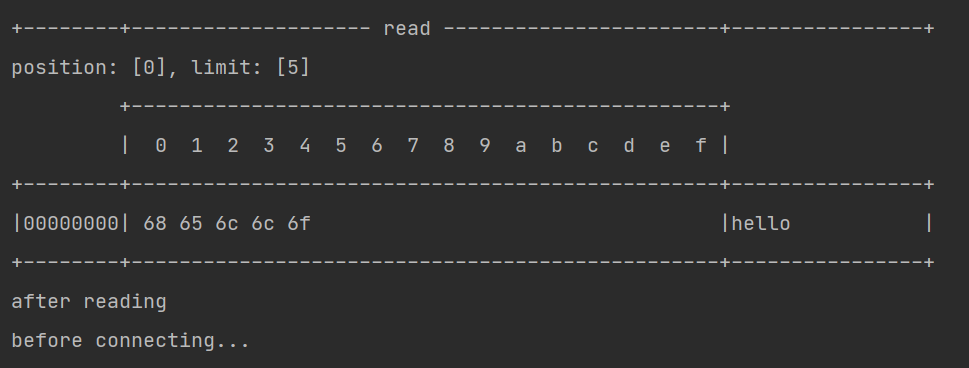
服务端打印内容:
+--------+-------------------- read -----------------------+----------------+
position: [0], limit: [5]
         +-------------------------------------------------+
         |  0  1  2  3  4  5  6  7  8  9  a  b  c  d  e  f |
+--------+-------------------------------------------------+----------------+
|00000000| 68 65 6c 6c 6f                                  |hello           |
+--------+-------------------------------------------------+----------------+
copy
after reading
before connecting...
填写客户端代码:
public class NettyClient {
    public static void main(String[] args) {
        try (SocketChannel socketChannel = SocketChannel.open()) {
            // 建立连接
            socketChannel.connect(new InetSocketAddress("localhost", 8080));
            Scanner scanner = new Scanner(System.in);
            System.out.println("请输入发送的内容:");
            // 发送内容
            String next = scanner.next();
            ByteBuffer byteBuffer = ByteBuffer.wrap(next.getBytes());
            while (byteBuffer.hasRemaining()) {
                socketChannel.write(byteBuffer);
            }
            // 读取响应
            System.out.println("收到服务端响应:");
            ByteBuffer responseBuffer = ByteBuffer.allocate(1024);
            while (socketChannel.isOpen() && socketChannel.read(responseBuffer) != -1) {
                if (responseBuffer.position() > 0) {
                    break;
                }
            }
            // 转为读取模式
            responseBuffer.flip();
            // 将 requestBuffer 中的数据读取到字节数组,然后打印出来
            byte[] content = new byte[responseBuffer.limit()];
            responseBuffer.get(content);
            System.out.println(new String(content));
        } catch (IOException e) {
            e.printStackTrace();
        }
    }
}
客户端打印的内容:
Connected to the target VM, address: '127.0.0.1:4832', transport: 'socket'
请输入发送的内容:
hello
收到服务端响应:
Disconnected from the target VM, address: '127.0.0.1:4832', transport: 'socket'
运行分析:
客户端-服务器建立连接前:服务器端因 accept 阻塞
客户端-服务器建立连接后,客户端发送消息前:服务器端因通道为空被阻塞
客户端发送数据后,服务器处理通道中的数据。再次进入循环时,再次被 accept 阻塞
之前的客户端再次发送消息,服务器端因为被 accept 阻塞,无法处理之前客户端发送到通道中的信息

非阻塞模式
可以通过 ServerSocketChannel 的 configureBlocking(false) 方法将获得连接设置为非阻塞的。此时若没有连接,accept 会返回 null
可以通过 SocketChannel 的 configureBlocking(false) 方法将从通道中读取数据设置为非阻塞的。若此时通道中没有数据可读,read 会返回 -1
服务器代码如下:
public class Server {
    public static void main(String[] args) {
        // 创建缓冲区
        ByteBuffer buffer = ByteBuffer.allocate(16);
        // 获得服务器通道
        try(ServerSocketChannel server = ServerSocketChannel.open()) {
            // 为服务器通道绑定端口
            server.bind(new InetSocketAddress(8080));
            // 用户存放连接的集合
            ArrayList<SocketChannel> channels = new ArrayList<>();
            // 循环接收连接
            while (true) {
                // 设置为非阻塞模式,没有连接时返回null,不会阻塞线程
                server.configureBlocking(false);
                SocketChannel socketChannel = server.accept();
                // 通道不为空时才将连接放入到集合中
                if (socketChannel != null) {
                    System.out.println("after connecting...");
                    channels.add(socketChannel);
                }
                // 循环遍历集合中的连接
                for(SocketChannel channel : channels) {
                    // 处理通道中的数据
                    // 设置为非阻塞模式,若通道中没有数据,会返回0,不会阻塞线程
                    channel.configureBlocking(false);
                    int read = channel.read(buffer);
                    if(read > 0) {
                        buffer.flip();
                        ByteBufferUtil.debugRead(buffer);
                        buffer.clear();
                        System.out.println("after reading");
                    }
                }
            }
        } catch (IOException e) {
            e.printStackTrace();
        }
    }
}
这样写存在一个问题,因为设置为了非阻塞,会一直执行 while(true) 中的代码,CPU一直处于忙碌状态,会使得性能变低,所以实际情况中不使用这种方法处理请求
所以这种自己检查是否有新连接,新消息的做法就很不合适了,因此引入了下面的这个 Selector 选择器
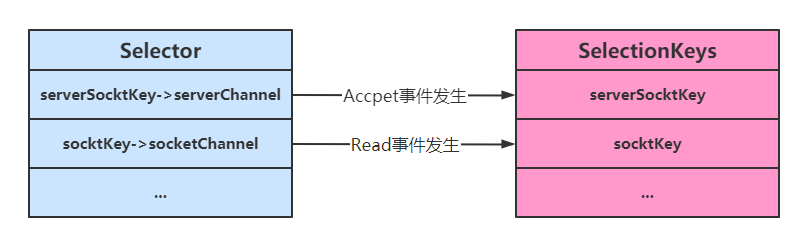
Selector 多路复用
单线程可以配合 Selector 完成对多个 Channel 可读写事件的监控,这称之为多路复用
多路复用仅针对网络 IO,普通文件 IO 无法利用多路复用 如果不用 Selector 的非阻塞模式,线程大部分时间都在做无用功,而 Selector 能够保证
- 有可连接事件时才去连接
- 有可读事件才去读取
- 有可写事件才去写入
限于网络传输能力,Channel 未必时时可写,一旦 Channel 可写,会触发 Selector 的可写事件
使用及 Accpet 事件
首先获得选择器 Selector
Selector selector = Selector.open();
将通道设置为非阻塞模式,并注册到选择器中,并设置感兴趣的事件
channel 必须工作在非阻塞模式 FileChannel 没有非阻塞模式,因此不能配合 selector 一起使用 绑定的事件类型可以有
- connect - 客户端连接成功时触发
- accept - 服务器端成功接受连接时触发
- read - 数据可读入时触发,有因为接收能力弱,数据暂不能读入的情况
- write - 数据可写出时触发,有因为发送能力弱,数据暂不能写出的情况
// 通道必须设置为非阻塞模式
server.configureBlocking(false);
// 将通道注册到选择器中,并设置感兴趣的实践
server.register(selector, SelectionKey.OP_ACCEPT);
通过 Selector 监听事件,并获得就绪的通道个数,若没有通道就绪,线程会被阻塞,它有如下几个策略:
1、阻塞直到绑定事件发生
int count = selector.select();
2、阻塞直到绑定事件发生,或是超时(时间单位为 ms)
int count = selector.select(long timeout);
3、不会阻塞,也就是不管有没有事件,立刻返回,自己根据返回值检查是否有事件
int count = selector.selectNow();
获取就绪事件并得到对应的通道,然后进行处理
// 获取所有事件
Set<SelectionKey> selectionKeys = selector.selectedKeys();

// 使用迭代器遍历事件
Iterator<SelectionKey> iterator = selectionKeys.iterator();

while (iterator.hasNext()) {
    SelectionKey key = iterator.next();

    // 判断key的类型,此处为Accept类型
    if(key.isAcceptable()) {
        // 获得key对应的channel
        ServerSocketChannel channel = (ServerSocketChannel) key.channel();

        // 获取连接并处理,而且是必须处理,否则需要取消
        SocketChannel socketChannel = channel.accept();

        // 处理完毕后移除
        iterator.remove();
    }
}
事件发生后能否不处理?
事件发生后,要么处理,要么取消(cancel),不能什么都不做,否则下次该事件仍会触发,这是因为 NIO 底层使用的是水平触发
Read 事件
在 Accept 事件中,若有客户端与服务器端建立了连接,需要将其对应的 SocketChannel 设置为非阻塞,并注册到选择其中 添加 Read 事件,触发后进行读取操作
public class SelectServer {
    public static void main(String[] args) {
        ByteBuffer buffer = ByteBuffer.allocate(16);
        // 获得服务器通道
        try(ServerSocketChannel server = ServerSocketChannel.open()) {
            server.bind(new InetSocketAddress(8080));
            // 创建选择器
            Selector selector = Selector.open();
            // 通道必须设置为非阻塞模式
            server.configureBlocking(false);
            // 将通道注册到选择器中,并设置感兴趣的实践
            server.register(selector, SelectionKey.OP_ACCEPT);
            // 为 serverKey 设置感兴趣的事件
            while (true) {
                // 若没有事件就绪,线程会被阻塞,反之不会被阻塞。从而避免了CPU空转
                // 返回值为就绪的事件个数
                int ready = selector.select();
                System.out.println("selector ready counts : " + ready);
                // 获取所有事件
                Set<SelectionKey> selectionKeys = selector.selectedKeys();
                // 使用迭代器遍历事件
                Iterator<SelectionKey> iterator = selectionKeys.iterator();
                while (iterator.hasNext()) {
                    SelectionKey key = iterator.next();
                    // 判断 key 的类型

                    // 如果是连接请求:
                    if(key.isAcceptable()) {
                        // 获得 key 对应的 channel
                        ServerSocketChannel channel = (ServerSocketChannel) key.channel();
                        System.out.println("before accepting...");
                        // 获取连接
                        SocketChannel socketChannel = channel.accept();
                        System.out.println("after accepting...");
                        // 设置为非阻塞模式,同时将连接的通道也注册到选择其中
                        socketChannel.configureBlocking(false);
                        socketChannel.register(selector, SelectionKey.OP_READ);
                        // 处理完毕后移除
                        iterator.remove();
                    }
                    // 如果是数据可读入时触发
                    else if (key.isReadable()) {
                        SocketChannel channel = (SocketChannel) key.channel();
                        System.out.println("before reading...");
                        channel.read(buffer);
                        System.out.println("after reading...");
                        buffer.flip();
                        ByteBufferUtil.debugRead(buffer);
                        buffer.clear();
                        // 处理完毕后移除
                        iterator.remove();
                    }
                }
            }
        } catch (IOException e) {
            e.printStackTrace();
        }
    }
}
删除事件
当处理完一个事件后,一定要调用迭代器的 Remove 方法移除对应事件,否则会出现错误。原因如下
以我们上面的 Read 事件 的代码为例
当调用了 server.register(selector, SelectionKey.OP_ACCEPT) 后,Selector 中维护了一个集合,用于存放 SelectionKey 以及其对应的通道
// WindowsSelectorImpl 中的 SelectionKeyImpl数组
private SelectionKeyImpl[] channelArray = new SelectionKeyImpl[8];
public class SelectionKeyImpl extends AbstractSelectionKey {
    // Key对应的通道
    final SelChImpl channel;
    ...
}
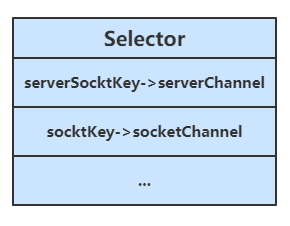
当选择器中的通道对应的事件发生后,selectionKeys 会被放到另一个集合中,但是 selectionKeys 不会自动移除,所以需要我们在处理完一个事件后,通过迭代器手动移除其中的 selectionKeys。
否则会导致已被处理过的事件再次被处理,就会引发错误
断开处理
当客户端与服务器之间的连接断开时,会给服务器端发送一个读事件,对异常断开和正常断开需要加以不同的方式进行处理
正常断开
正常断开时,服务器端的 channel.read(buffer) 方法的返回值为 -1,所以当结束到返回值为 -1 时,需要调用 key 的 cancel 方法取消此事件,并在取消后移除该事件
int read = channel.read(buffer);
// 断开连接时,客户端会向服务器发送一个写事件,此时read的返回值为-1
if(read == -1) {
    // 取消该事件的处理
    key.cancel();
    channel.close();
} else {
    ...
}
// 取消或者处理,都需要移除key
iterator.remove();
异常断开
异常断开时,会抛出 IOException 异常, 在 try-catch 的 catch 块中捕获异常并调用 key 的 cancel 方法即可
使用示例
要使用 Selector 实现多路复用,服务端代码如下改进
public class SelectServer {
    public static void main(String[] args) {
        ByteBuffer buffer = ByteBuffer.allocate(16);
        // 获得服务器通道
        try(ServerSocketChannel server = ServerSocketChannel.open()) {
            server.bind(new InetSocketAddress(8080));
            // 创建选择器
            Selector selector = Selector.open();

            // 通道必须设置为非阻塞模式
            server.configureBlocking(false);
            // 将通道注册到选择器中,并设置感兴趣的事件
            server.register(selector, SelectionKey.OP_ACCEPT);
            while (true) {
                // 若没有事件就绪,线程会被阻塞,反之不会被阻塞。从而避免了CPU空转
                // 返回值为就绪的事件个数
                int ready = selector.select();
                System.out.println("selector ready counts : " + ready);

                // 获取所有事件
                Set<SelectionKey> selectionKeys = selector.selectedKeys();

                // 使用迭代器遍历事件
                Iterator<SelectionKey> iterator = selectionKeys.iterator();
                while (iterator.hasNext()) {
                    SelectionKey key = iterator.next();

                    // 判断key的类型
                    if(key.isAcceptable()) {
                        // 获得key对应的channel
                        ServerSocketChannel channel = (ServerSocketChannel) key.channel();
                        System.out.println("before accepting...");

                        // 获取连接并处理,而且是必须处理,否则需要取消
                        SocketChannel socketChannel = channel.accept();
                        System.out.println("after accepting...");

                        // 处理完毕后移除
                        iterator.remove();
                    }
                }
            }
        } catch (IOException e) {
            e.printStackTrace();
        }
    }
}
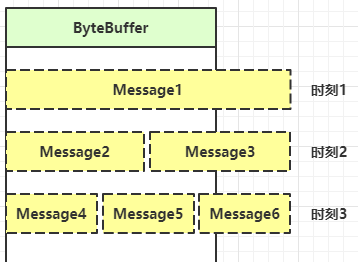
消息边界问题
不处理消息边界存在的问题
将缓冲区的大小设置为 4 个字节,发送 2 个汉字(你好),通过 decode 解码并打印时,会出现乱码
ByteBuffer buffer = ByteBuffer.allocate(4);
// 解码并打印
System.out.println(StandardCharsets.UTF_8.decode(buffer));
你�
��
这是因为 UTF-8 字符集下,1 个汉字占用 3 个字节,此时缓冲区大小为 4 个字节,一次读时间无法处理完通道中的所有数据,所以一共会触发两次读事件。这就导致 你好 的 好 字被拆分为了前半部分和后半部分发送,解码时就会出现问题
处理消息边界
传输的文本可能有以下三种情况
- 文本大于缓冲区大小(此时需要将缓冲区进行扩容)
- 发生半包现象
- 发生粘包现象
解决思路大致有以下三种
1、固定消息长度,数据包大小一样,服务器按预定长度读取,当发送的数据较少时,需要将数据进行填充,直到长度与消息规定长度一致。缺点是浪费带宽
2、另一种思路是按分隔符拆分,缺点是效率低,需要一个一个字符地去匹配分隔符(之前讲过)
3、TLV 格式,即 Type 类型、Length 长度、Value 数据(也就是在消息开头用一些空间存放后面数据的长度),如 HTTP 请求头中的 Content-Type 与 Content-Length。类型和长度已知的情况下,就可以方便获取消息大小,分配合适的 buffer,缺点是 buffer 需要提前分配,如果内容过大,则影响 server 吞吐量
- Http 1.1 是 TLV 格式
- Http 2.0 是 LTV 格式

下文的消息边界处理方式为第二种:按分隔符拆分
附件与扩容
Channel 的 register 方法还有第三个参数:附件,可以向其中放入一个 Object 类型的对象,该对象会与登记的 Channel 以及其对应的 SelectionKey 绑定,可以从 SelectionKey 获取到对应通道的附件
public final SelectionKey register(Selector sel, int ops, Object att)
可通过 SelectionKey 的 attachment() 方法获得附件
ByteBuffer buffer = (ByteBuffer) key.attachment();
我们需要在 Accept 事件发生后,将通道注册到 Selector 中时,对每个通道添加一个 ByteBuffer 附件,让每个通道发生读事件时都使用自己的通道,避免与其他通道发生冲突而导致问题
// 设置为非阻塞模式,同时将连接的通道也注册到选择其中,同时设置附件
socketChannel.configureBlocking(false);
ByteBuffer buffer = ByteBuffer.allocate(16);
// 添加通道对应的Buffer附件
socketChannel.register(selector, SelectionKey.OP_READ, buffer);
当 Channel 中的数据大于缓冲区时,需要对缓冲区进行 扩容 操作。
此代码中的扩容的判定方法:Channel 调用 compact 方法后,它的 position 与 limit 相等,说明缓冲区中的数据并未被读取(容量太小),此时创建新的缓冲区,其大小扩大为两倍。(具体的大小分配策略看下一节)
同时还要将旧缓冲区中的数据拷贝到新的缓冲区中,同时调用 SelectionKey 的 attach 方法将新的缓冲区作为新的附件放入 SelectionKey 中
// 如果缓冲区太小,就进行扩容
if (buffer.position() == buffer.limit()) {
    ByteBuffer newBuffer = ByteBuffer.allocate(buffer.capacity() * 2);
    // 将旧buffer中的内容放入新的buffer中
    ewBuffer.put(buffer);
    // 将新buffer作为附件放到key中
    key.attach(newBuffer);
}
改造后的服务器代码
public class SelectServer {
    public static void main(String[] args) {
        // 获得服务器通道
        try(ServerSocketChannel server = ServerSocketChannel.open()) {
            server.bind(new InetSocketAddress(8080));
            // 创建选择器
            Selector selector = Selector.open();
            // 通道必须设置为非阻塞模式
            server.configureBlocking(false);
            // 将通道注册到选择器中,并设置感兴趣的事件
            server.register(selector, SelectionKey.OP_ACCEPT);
            // 为serverKey设置感兴趣的事件
            while (true) {
                // 若没有事件就绪,线程会被阻塞,反之不会被阻塞。从而避免了CPU空转
                // 返回值为就绪的事件个数
                int ready = selector.select();
                System.out.println("selector ready counts : " + ready);
                // 获取所有事件
                Set<SelectionKey> selectionKeys = selector.selectedKeys();
                // 使用迭代器遍历事件
                Iterator<SelectionKey> iterator = selectionKeys.iterator();
                while (iterator.hasNext()) {
                    SelectionKey key = iterator.next();
                    // 判断key的类型
                    if(key.isAcceptable()) {
                        // 获得key对应的channel
                        ServerSocketChannel channel = (ServerSocketChannel) key.channel();
                        System.out.println("before accepting...");
                        // 获取连接
                        SocketChannel socketChannel = channel.accept();
                        System.out.println("after accepting...");
                        // 设置为非阻塞模式,同时将连接的通道也注册到选择其中,同时设置附件
                        socketChannel.configureBlocking(false);
                        ByteBuffer buffer = ByteBuffer.allocate(16);
                        socketChannel.register(selector, SelectionKey.OP_READ, buffer);
                        // 处理完毕后移除
                        iterator.remove();
                    } else if (key.isReadable()) {
                        SocketChannel channel = (SocketChannel) key.channel();
                        System.out.println("before reading...");
                        // 通过key获得附件(buffer)
                        ByteBuffer buffer = (ByteBuffer) key.attachment();
                        int read = channel.read(buffer);
                        if(read == -1) {
                            key.cancel();
                            channel.close();
                        } else {
                            // 通过分隔符来分隔buffer中的数据
                            split(buffer);
                            // 如果缓冲区太小,就进行扩容
                            if (buffer.position() == buffer.limit()) {
                                ByteBuffer newBuffer = ByteBuffer.allocate(buffer.capacity()*2);
                                // 将旧buffer中的内容放入新的buffer中
                                buffer.flip();
                                newBuffer.put(buffer);
                                // 将新buffer放到key中作为附件
                                key.attach(newBuffer);
                            }
                        }
                        System.out.println("after reading...");
                        // 处理完毕后移除
                        iterator.remove();
                    }
                }
            }
        } catch (IOException e) {
            e.printStackTrace();
        }
    }

    private static void split(ByteBuffer buffer) {
        buffer.flip();
        for(int i = 0; i < buffer.limit(); i++) {
            // 遍历寻找分隔符
            // get(i)不会移动position
            if (buffer.get(i) == '\n') {
                // 缓冲区长度
                int length = i+1-buffer.position();
                ByteBuffer target = ByteBuffer.allocate(length);
                // 将前面的内容写入target缓冲区
                for(int j = 0; j < length; j++) {
                    // 将buffer中的数据写入target中
                    target.put(buffer.get());
                }
                // 打印结果
                ByteBufferUtil.debugAll(target);
            }
        }
        // 切换为写模式,但是缓冲区可能未读完,这里需要使用compact
        buffer.compact();
    }
}
ByteBuffer 的大小分配策略
每个 channel 都需要记录可能被切分的消息,因为 ByteBuffer 不能被多个 channel 共同使用,因此需要为每个 channel 维护一个独立的 ByteBuffer
ByteBuffer 不能太大,比如一个 ByteBuffer 1Mb 的话,要支持百万连接就要 1Tb 内存,因此需要设计大小可变的 ByteBuffer
分配思路可以参考: 1、一种思路是首先分配一个较小的 buffer,例如 4k,如果发现数据不够,再分配 8k 的 buffer,将 4k buffer 内容拷贝至 8k buffer,优点是消息连续容易处理,缺点是数据拷贝耗费性能,参考实现 http://tutorials.jenkov.com/java-performance/resizable-array.html
2、另一种思路是用多个数组组成 buffer,一个数组不够,把多出来的内容写入新的数组,与前面的区别是消息存储不连续解析复杂,优点是避免了拷贝引起的性能损耗
Write 事件
服务器通过 Buffer 向通道中写入数据时,可能因为通道容量小于 Buffer 中的数据大小,导致无法一次性将 Buffer 中的数据全部写入到 Channel 中,这时便需要分多次写入,具体步骤如下
1、执行一次写操作,向将 buffer 中的内容写入到 SocketChannel 中,然后判断 Buffer 中是否还有数据
2、若 Buffer 中还有数据,则需要将 SocketChannel 注册到 Selection 中,并关注写事件,同时将未写完的 Buffer 作为附件一起放入到 SelectionKey 中
int write = socket.write(buffer);
// 通道中可能无法放入缓冲区中的所有数据
if (buffer.hasRemaining()) {
    // 注册到Selector中,关注可写事件,并将buffer添加到key的附件中
    socket.configureBlocking(false);
    socket.register(selector, SelectionKey.OP_WRITE, buffer);
}
添加写事件的相关操作 key.isWritable(),对 Buffer 再次进行写操作
每次写后需要判断 Buffer 中是否还有数据(是否写完)。若写完,需要移除 SelectionKey 中的 Buffer 附件,避免其占用过多内存,同时还需移除对写事件的关注
SocketChannel socket = (SocketChannel) key.channel();
// 获得buffer
ByteBuffer buffer = (ByteBuffer) key.attachment();
// 执行写操作
int write = socket.write(buffer);
System.out.println(write);
// 如果已经完成了写操作,需要移除key中的附件,同时不再对写事件感兴趣
if (!buffer.hasRemaining()) {
    key.attach(null);
    key.interestOps(0);
}
整体代码
public class WriteServer {
    public static void main(String[] args) {
        try(ServerSocketChannel server = ServerSocketChannel.open()) {
            server.bind(new InetSocketAddress(8080));
            server.configureBlocking(false);
            Selector selector = Selector.open();
            server.register(selector, SelectionKey.OP_ACCEPT);
            while (true) {
                selector.select();
                Set<SelectionKey> selectionKeys = selector.selectedKeys();
                Iterator<SelectionKey> iterator = selectionKeys.iterator();
                while (iterator.hasNext()) {
                    SelectionKey key = iterator.next();
                    // 处理后就移除事件
                    iterator.remove();
                    if (key.isAcceptable()) {
                        // 获得客户端的通道
                        SocketChannel socket = server.accept();
                        // 写入数据
                        StringBuilder builder = new StringBuilder();
                        for(int i = 0; i < 500000000; i++) {
                            builder.append("a");
                        }
                        ByteBuffer buffer = StandardCharsets.UTF_8.encode(builder.toString());
                        // 先执行一次Buffer->Channel的写入,如果未写完,就添加一个可写事件
                        int write = socket.write(buffer);
                        System.out.println(write);
                        // 通道中可能无法放入缓冲区中的所有数据
                        if (buffer.hasRemaining()) {
                            // 注册到Selector中,关注可写事件,并将buffer添加到key的附件中
                            socket.configureBlocking(false);
                            socket.register(selector, SelectionKey.OP_WRITE, buffer);
                        }
                    } else if (key.isWritable()) {
                        SocketChannel socket = (SocketChannel) key.channel();
                        // 获得buffer
                        ByteBuffer buffer = (ByteBuffer) key.attachment();
                        // 执行写操作
                        int write = socket.write(buffer);
                        System.out.println(write);
                        // 如果已经完成了写操作,需要移除key中的附件,同时不再对写事件感兴趣
                        if (!buffer.hasRemaining()) {
                            key.attach(null);
                            key.interestOps(0);
                        }
                    }
                }
            }
        } catch (IOException e) {
            e.printStackTrace();
        }
    }
}
UDP 请求
- UDP 是无连接的,client 发送数据不会管 server 是否开启
- server 这边的 receive 方法会将接收到的数据存入 byte buffer,但如果数据报文超过 buffer 大小,多出来的数据会被默默抛弃
首先启动服务器端
public class UdpServer {
    public static void main(String[] args) {
        try (DatagramChannel channel = DatagramChannel.open()) {
            channel.socket().bind(new InetSocketAddress(9999));
            System.out.println("waiting...");
            ByteBuffer buffer = ByteBuffer.allocate(32);
            channel.receive(buffer);
            buffer.flip();
            debug(buffer);
        } catch (IOException e) {
            e.printStackTrace();
        }
    }
}
输出
waiting...
运行客户端
public class UdpClient {
    public static void main(String[] args) {
        try (DatagramChannel channel = DatagramChannel.open()) {
            ByteBuffer buffer = StandardCharsets.UTF_8.encode("hello");
            InetSocketAddress address = new InetSocketAddress("localhost", 9999);
            channel.send(buffer, address);
        } catch (Exception e) {
            e.printStackTrace();
        }
    }
}
接下来服务器端输出
         +-------------------------------------------------+
         |  0  1  2  3  4  5  6  7  8  9  a  b  c  d  e  f |
+--------+-------------------------------------------------+----------------+
|00000000| 68 65 6c 6c 6f                                  |hello           |
+--------+-------------------------------------------------+----------------+